Tuesday, August 30, 2011

Jalapeno Popper Dip

DSC_0016
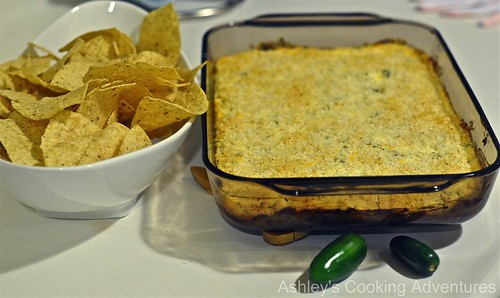
This weekend was the first party in our new neighborhood. I wanted to try recipe I'd never made before and bring something for a crowd. Since I'd been wanting to make jalapeno popper dip for a while and I decided this was the perfect occasion. It was a toss up whether the commissary (military grocery store) would have jalapenos because we get limited produce over here in Okinawa. Thankfully there was a bag of fresh jalapenos just waiting for me to use it in this creamy, cheesy, spicy, and intensely flavorful dip. 
DSC_6270
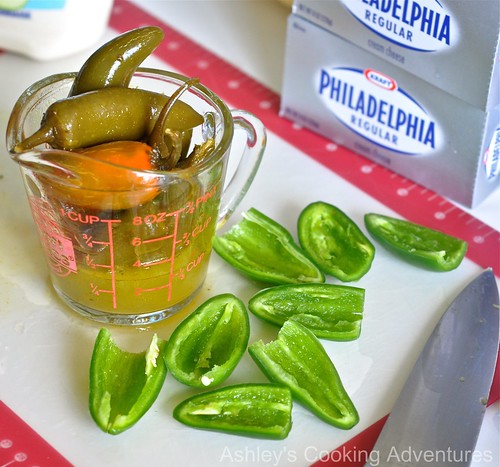
If you don't like too much heat I would recommend using only 2 fresh jalapenos instead of 4. Served with lime tortilla chips for scooping this dip was a hit at the party and will be at yours too!
DSC_6267
Jalapeno Popper Dip
From Closet Cooking 
Makes a 9X13 casserole dish 
Printable Version
Ingredients
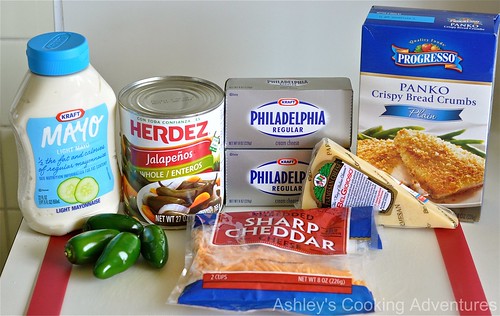
2 (8 ounce) packages of cream cheese at room temperature
1 cup mayonnaise
1 cup cheddar cheese, grated
1 cup parmigiano reggiano, grated
8 ounces sliced jalapenos (canned)
4 fresh jalapenos peppers, chopped
1/2 cup panko bread crumbs
1/2 cup parmigiano reggiano 


Directions
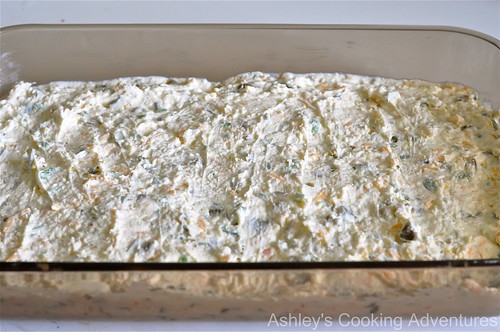
Preheat oven to 374 degrees. Combine the cream cheese, mayonnaise, cheddar cheese, 1/2 cup parmigiano reggiano and jalapenos in a large bowl.
DSC_6276
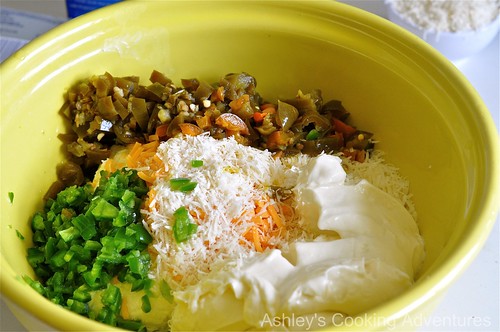
Mix until completely combined. Spread into a 9X13 casserole dish.
DSC_6282
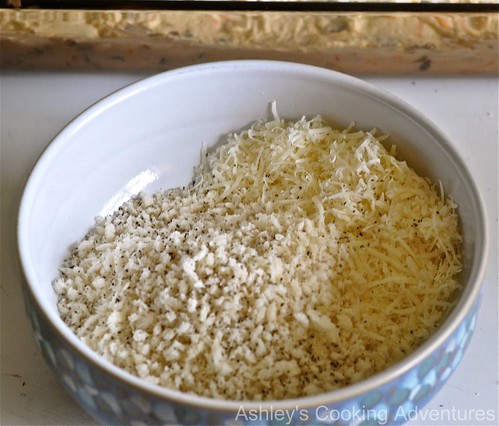
Mix together the panko bread crumbs and remaining 1/2 cup of parmigiano reggiano and sprinkle over the top of the dip. 
DSC_6283
Bake uncovered until bubbling and sides and golden brown on top about 15-20 minutes. Serve immediately.
DSC_0014

Saturday, August 27, 2011

Chicken, Pasta, and Mixed Vegetable Bake

DSC_6245
Okay, I know I'm not fooling anyone, this dish is actually a casserole. But I grew up eating waaaaay too many casseroles (sorry, Mom) so I have a problem calling anything I make a casserole. I hope that you will just humor me and play along and call this a "bake". Thank you! :) 
DSC_6242
I made this the first week we were in our new house because I was short on time but hubby and I were hungry from all the manual labor of painting rooms and hauling boxes. We both enjoyed the creamy combinations of pasta, diced chicken, and veggies along with the breaded topping. It made a big serving so that we could both have the leftovers for lunch the next day. 
DSC_6228
Chicken, Pasta, and Mixed Vegetable Bake
From allrecipes.com
Printable Version
Ingredients
1 cup dry pasta (any kind will do but I'm partial to bow tie)
3 tablespoons olive oil
6 chicken tenderloins cut into chunks (or 2 small chicken breasts)
2 stalks of celery, diced
1 tablespoon minced onion (I omitted this)
salt and pepper to taste
garlic powder to taste
1 (10.75 ounce) can condensed cream of chicken soup
1 (10.75 ounce) can cream of mushroom soup
2 cups frozen vegetables (fresh would work too!)
1 cup bread crumbs
2 tablespoons grated Parmesan cheese
2 tablespoons butter, melted


Directions
Preheat oven to 400 degrees. Lightly grease a medium baking dish. Bring a large pot of lightly salted water to a boil and cook the pasta until al dente, according to package instructions. Drain. Heat the oil in a large skillet over medium heat. Place chicken  and the celery in the skillet and season with the onion, salt, pepper, and garlic powder. Cook until chicken juices run clear, about 5 minutes.
DSC_6232
Mix in the cooked pasta along with the soups and mixed vegetables. Transfer to the prepared baking dish. 
DSC_6235
In a small bowl combine the bread crumbs, Parmesan cheese, and butter.
DSC_6233
Spread evenly over the casserole. Bake for 30 minutes until bubbly and lightly browned.
DSC_6244


Tuesday, August 23, 2011

Pan Seared Shrimp with Garlic Lemon Butter

DSC_6262
Hubby and I are FINALLY in our new home in Okinawa and have been busy unpacking and getting settled the past week. When our household goods arrived I dove right in and unpacked our kitchen items first (of course!). Wow, having my own dishes, pots, pans, and cooking utensils have made me feel so much more at home here. Since I haven't had a lot of time to cook I have been choosing recipes that are quick and simple like these pan seared shrimp.  The original recipe calls for fresh parsley, which I didn't have, but it would have been the perfect compliment to the butter, garlic, and lemon sauce. I think cilantro would also be excellent too. Served on top of toasted pine nut couscous this was a filling and fast dinner.
DSC_6248
Pan Seared Shrimp with Garlic Lemon Butter
From Food.com
Serves 4
Printable Version
Ingredients
3 tablespoons butter, softened
1 medium garlic clove, minced (I used 2 teaspoons store bought minced garlic)
1 tablespoon lemon juice
2 tablespoons fresh parsley, chopped
1/8 teaspoon salt
2 tablespoons olive oil
1 1/2 pounds shrimp (21-25 shrimp), peeled and deveined 
1/4 teaspoon salt
1/4 teaspoon pepper
1/8 teaspoon sugar


Directions
Beat butter with a fork in a small bowl until light and fluffy. Stir in the garlic, lemon juice, parsley, and 1/8 teaspoon salt until combined. Set aside.
DSC_6260
Heat 1 tablespoon of olive oil in a large pan over high heat. Meanwhile toss shrimp with salt, pepper, and sugar in a bowl. 
DSC_6253
Add half of the shrimp to the pan in a single layer and cook until spotty brown and the edges turn pink, about 1 minute on the first side then flip and heat about 30 seconds on the other side. 
DSC_6255
Remove from heat using tongs and transfer to a large bowl. Repeat with the remaining shrimp and oil. Then return the first batch of shrimp to the pan along with the flavored butter and toss to combine. Serve hot over couscous, rice, or even lettuce to make a nice salad. 
DSC_6261

Tuesday, August 16, 2011

Japanese Curry

DSC_6179
Since moving to Japan we have been very eager to not only try the local cuisine at nearby restaurants, but also try making them ourselves at home. We had been told before moving that Japanese curry was out of this world and different from the curries we have tried in the United States. We ate our first curry here a couple of weeks ago and it was delicious! Dark brown colored and very spicy, even though I ordered mild. I got mine with all veggies but hubby got tempura beef. Even though mine was excellent, I have to say, his was better! We enjoyed the curry so much that we decided to try our own at home. The groceries stores here carry Japanese curry sauce mixes such as Golden Curry, the one that I bought. 

I believe if you look in the international section at your local grocery store you should be able to find this brand too. Just look on the box and make sure it's from Japan!  

I used chicken in mine, but you can also use shrimp, beef, or lamb. I served it on udon noodles at hubby's suggestion. Udon noodles are thick, chewy Japanese noodles made from wheat flour.  

DSC_6165
Although the box also said to serve over noodles or rice, I really think rice would be better. Plus at the curry restaurant they served it on rice, so I am sure that is more authentic.
DSC_6149
Japanese Curry
Recipe from Golden Curry Box
Printable Version
Ingredients
1 pound chicken breasts
1 onion, chopped finely
3 tablespoons cooking oil
Several carrots, chopped
1 red pepper, chopped
1/2 package of tofu (this was another addition I added on my own!)
1 cup of water
3/5 ounces Golden Curry Sauce Mix
Noodles or rice for serving
*I also garnished each dish with chopped green onion
DSC_6181
Directions
Cut the meat into cubes. Add oil to a large pan and stir-fry meat and onions until onions are slightly browned. Add carrots and red pepper (celery and/or potatoes is also recommended). 
DSC_6154
Add water and bring to a boil. Reduce heat, cover, and simmer until meat is tender, approximately ten minutes. Remove from the heat and break the curry sauce into pieces, then add them to the skillet.
DSC_6160
Stir until curry is completely dissolved. Stir in tofu gently. 
DSC_6169
Simmer five minutes, stirring constantly. 
DSC_6163
Serve hot over rice or noodles. 

Friday, August 12, 2011

Miso Soup

DSC_6107
For my second post from Japan, I decided to go with Miso Soup. I've always enjoyed Miso Soup when dining at Sushi restaurants in The States. I love it's subtle taste and the different textures from the seaweed and tofu. It is very healthy and hubby even says he thinks it has "healing powers". Not so sure about that, but when I looked it up on Wikipedia, it did say that some researchers believe it it can reduce the risks of breast cancer. 
DSC_6102
It was fun shopping for the ingredients for the soup and guessing as to what things were. I was proud that for my first time I found all the correct items. I think I went a little overboard on the seaweed, mushrooms and tofu, so next time I will scale it back a little. This recipe makes 4 one cup servings.
DSC_6089
Miso Soup 
From my Japanese Food Explorers Guide, given to us at our orientation :)
Printable Version
Ingredients
6 ounces tofu
2 1/2 tablespoons Miso (fermented soy bean paste)
3 cups Katsuo dashi (fish soup stock)
1 green onion
1/2 cup small mushroom or seaweed (I went with 1/2 cup of each and it was too much)
DSC_6090
Directions
Cut tofu into 1/2 inch cubes. 
DSC_6095
Chop green onions. Heat soup stock in a sauce pan. I did this by heating 4 cups of water and adding in the Katsuo dashi (fish stock). Bring to a boil. Add green onion. Mix miso into soup stock. Add tofu cubes, seaweed, and mushrooms and bring to a boil. 
DSC_6097
Remove from heat and serve in small bowls. 
DSC_6109

Saturday, August 6, 2011

First Post from Japan: Goya Champuru

DSC_5897
Konnichiwa! Hubby and I have been in Japan for 6 days now, 3 of which we have had to spend inside, sequestered to our hotel room riding out Typhoon Muifa! What a welcome to Japan! We are awaiting base housing which has been delayed due to the typhoon, so I haven't been able to do much cooking yet. Thankfully our good friends took us shopping and invited us into their home (and kitchen) where I helped make goya chapuru. Shopping in an authentic Japanese market was an adventure in itself! Of course everything is in Japanese, so we relied on packaging and our friends pointing things out to understand what most items were. 
DSC_5840
After we found the items we needed, we checked out and headed home to start cooking. That night we made homemade sushi, miso soup, and goya champuru. I decided to share the goya champuru with you first, since it's not very different from scrambled eggs! Goya is a bitter melon and is a staple in the diet of Okinawans. 
DSC_5845
Champuru is an Okinawan term that means "mixture". After doing a little a research, I discovered there are many variations to goya champuru. Some call for garlic and onions, some use tofu, and all are probably very similar tasting. The similarity in all of the recipes are the incorporation of goya, eggs, soy sauce, and salt and pepper. 
DSC_5879
I am going to share with you the recipe that we created. Although I realize most of you will not be able to find goya, if you have an Asian market near you it is possible!
DSC_5842
As for my blog, I would love your input on where to go from here. Are you interested in seeing more Japanese recipes even if that means you may not have access to the ingredients?  Would you like to see a blending of both American and Japanese cuisines? Any comments or suggestions would be greatly appreciated! 
DSC_5854
Goya Champuru
Printable Version
Ingredients
1 large goya
2 tablespoons cooking oil
8 slices bacon, cooked and crumbled
6 eggs
1 tablespoon soy sauce
Salt and pepper 


Directions
Wash goya carefully, do not peel. Slice lengthwise and discard seeds and inside with a spoon.
DSC_5858
Slice very thinly. Heat oil in a wok or saute pan and add goya, cooking until soft.
DSC_5873
In a separate bowl, crack and whisk eggs. 
DSC_5875
Add into the wok along with the crumbled bacon. 
DSC_5863
Pour in the soy sauce. Scramble everything together, making sure not to overcook
DSC_5877
Season to taste with salt and pepper. Serve immediately. 
DSC_5896

Thursday, August 4, 2011

Strawberry Blueberry Clafoutis

DSC_5472
It was blueberry season in Michigan while hubby and I were visiting our family this July.
So we decided to head to a blueberry farm one beautiful morning and to pick some fresh, plump blueberries ripened by the summer sun.
IMG_0700 
We were one of the only people picking at the farm, so we each grabbed a bucket and raced to find the biggest blueberries. It only took us 45 minutes to fill our buckets with these little lovelies. 
IMG_0701
We used the berries in pancakes, muffins, straight from the bowl, and in this Strawberry Blueberry Clafoutis. What is a clafoutis?? I had no idea either until I saw this post from Honest Fare. Gabrielle taught me that Clafouti (pronounced CLA-FOO-TEE) is a French rustic style dessert that traditionally is made with whole cherries. It can also be made with fresh berries and is a beautiful, simple recipe that ends up tasting like a mix between cake, custard and bread pudding. This is one of those great desserts that you can use any fruit or berry that you have on hand.
DSC_5459
I made my Clafoutis for a send off party with my good friends. I didn't get a good picture of it after it came out of the oven, but it was pretty flat because I used a 9X13 pan. Next time I would use a deeper, pretty bowl for thicker Clafoutis and better presentation!
DSC_5440
Strawberry Blueberry Clafoutis
From Honest Fare
Printable Version
Ingredients
1 1/4 cups milk
1/2 cup sugar
3 eggs
1/2 cup flour
1/4 teaspoon salt
1 tablespoon vanilla
1/4 teaspoon lemon zest
1/8 teaspoon cinnamon
1 cup strawberries, sliced into small pieces
1 cup blueberries
Whipped cream (optional)
DSC_5441
Directions
Preheat oven to 350 degrees. In a blender blend the milk, 1/3 cup of the sugar, eggs, vanilla, salt, lemon zest, cinnamon, and flour.
DSC_5448
Pour a 1/4 inch layer of the batter in a lightly and evenly buttered fireproof baking dish. Place in the oven until the batter firms up a bit (a film will set in the pan) about 8 minutes. 
DSC_5452
Remove from oven and place the berries over the batter. Sprinkle on remaining sugar and pour on the rest of the batter evenly.
DSC_5467
Bake at 350 degrees for about 45 minutes to an hour. The clafouti is done when puffed and brown and knife plunged in the center comes out clean. Great served warm or room temperature with whipped cream. Refrigerate leftovers.
DSC_5474

LinkWithin

Related Posts with Thumbnails