Saturday, December 26, 2009

Grilled Ribeye Steak with Onion-Blue Cheese Sauce


To....die....for! That is what my husband said about these Grilled Ribeye Steaks with Onion-Blue Cheese Sauce. I borrowed this recipe from one of the best cooking blogs out there, The Pioneer Woman (http://thepioneerwoman.com/cooking/). I feel like I gain weight just browsing Ree Drummond's delicious recipes. She is so down to earth and so funny. Her food blog is light hearted and entertaining. Best of all she shows you what the recipe looks like step by step.

Once I saw how this recipe combined sauteed onions with melted blue cheese I knew it was the perfect choice for Christmas Dinner. My husband loves steak, but I rarely use beef at home, so I knew this would make him a very happy man. I added a blend of sauteed mushrooms to the top of the steak and served it with oven baked dill potatoes. Yum! Be sure to try this amazing sauce. It would be great on pretty much anything...chicken, potatoes, eggs, or Ree even says it can be served as a side. Sooooo good, yet so bad.


Ingredients
  • 2 whole Ribeye Steaks
  • 2 Tablespoons Butter
  • Salt
  • Pepper
  • 4 Tablespoons Butter
  • 1 whole Very Large Yellow Onion, Sliced
  • 1 cup Heavy Cream
  • ½ cups Crumbled Blue Cheese
Instructions
Salt and pepper both sides of the steaks. Grill until
medium rare.
Saute the onions in 4 tablespoons of butter over high
heat. Cook for 5 to 7 minutes, or until dark and
caramelized. Reduce heat to summer and pour in cream.
Cook for 3 to 5 minutes, or until reduced by half.
Stir in blue cheese until melted.
Serve steaks on generous portion of sauce.

Faint.

Friday, December 25, 2009

Snickerdoodles


These are probably my all time favorite cookies. I'm not much of a chocolate fan...when given the choices between several cookies, I'll usually pick any kind of cookie but chocolate chip. This makes me a weirdo, I know, but it's why I love these sugar cookies that are covered in yummy cinnamon and sugar.

My mom made these cookies for my brother and I all the time when we were kids. I have such wonderful memories of coming home from school to the smell of freshly baked cookies. My mom was that kind of mom, and I am very lucky for that.

I made these cookies today for my husband and I to have as a little treat on Christmas. The smell of cinnamon in our house on Christmas reminds me of my parent's home, and on a Holiday when we can't be with our family, it's very comforting. Besides all of the nostalgia associated with these cookies for me, they melt in your mouth. Be careful, because if you're like me you're likely to pop 5 of these babies in your mouth without a second thought.

Snickerdoodles

Ingredients
1/2 cup butter, softened
1 cup sugar
1/4 teaspoon baking soda
1/4 teaspoon cream of tartar
1 egg
1/2 teaspoon of vanilla
1 1/2 cups flour
2 tablespoons sugar
1 teaspoon ground cinnamon

Directions
In a medium mixing bowl beat butter with an electric mixer on medium to high speed for 30 seconds. Add the 1 cup of sugar, baking soda, and cream of tartar. Beat until combined, scraping the sides of the bowl occasionally. Beat in the egg and vanilla until combined. Beat in as much flour as you can with the mixer. Stir in any remaining flour. Cover and chill dough about 1 hour or until easy to handle.

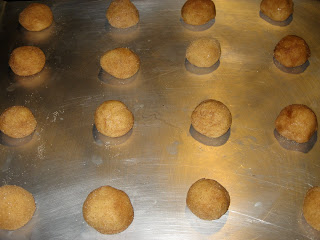
Preheat the oven to 375. Combine the 2 tablespoons of sugar and the cinnamon. Shape the dough into 1 inch balls. Roll the balls in the sugar-cinnamon mixture to coat. Place 2 inches apart on an ungreased cooking sheet. Bake for 10 to 11 minutes until the edges of the cookies are golden. Transfer to a wire rack and let cool.


Caesar Salad Spears


I adapted this recipe from the December issue of Food&Wine magazine. Although we've subscribed to the magazine for almost a year, and I've seen dozens and dozens of amazing dishes that I've wanted to try, this is actually the first recipe I've made . I pulled a "Sandra Lee" of Semi-Homemade on the Food Network, and modified this for time and convenience, as I used store bought croutons and store bought Caesar dressing. I added in about 1/4 cup of Pine Nuts, because I had them on hand. They added a great nutty crunch. I am sure that using the dressing from the recipe would have made it even more tasty, but this was a great little snack. I would definitely serve it again for company or as an appetizer at a party. It's so cute and such a unique way to serve Caesar Salad. The following is for 2 servings, so if you want to serve it to more people, or follow the original recipe from Food&Wine, click on the title of the recipe.

Ingredients:

2 Belgian Endives
1/4 cup Caesar Dressing
1/2 cup Croutons
1/4 cup Pine Nuts
1/4 cup freshly grated Parmigiano-Reggiano cheese
Freshly grated black pepper

Directions:
Trim the endives and remove 6 of the largest leaves to arrange on a plate. Stack the remainder of the leaves and thinly slice them. Toss the sliced leaves with Caesar Dressing and the pine nuts. Add in the cracked black pepper. Spoon the salad onto each spear and garnish with croutons and grated cheese. Serve immediately.

Cheesy Broccoli and Cauliflower Soup


This week after my mom shared with me that she made a broccoli cheese soup I began craving it like crazy. I decided to use this recipe from the Food Network, but modified it by adding in cauliflower. The results were a belly warming, cheesy soup. This recipe makes a huge batch, great for a family dinner. The Food Network recipe includes directions for a bread bowl, next time I'll have to try that.


Ingredients


6 tablespoons unsalted butter

1 small onion, chopped

1/4 cup all-purpose flour

2 cups half-and-half

3 cups low-sodium chicken broth

2 bay leaves

1/4 teaspoon freshly grated nutmeg

Kosher salt and freshly ground pepper

1 head of broccoli, chopped

1 head of cauliflower, chopped

1 large carrot, diced

2 1/2 cups (about 8 ounces) grated sharp white and yellow cheddar cheese, plus more for garnish


Directions

Melt the butter in a large Dutch oven or pot over medium heat.

Add the onion and cook until tender, about 5 minutes.

Whisk in the flour and cook until golden, 3 to 4 minutes, then gradually whisk in the half-and-half until smooth.

Add the chicken broth, bay leaves and nutmeg, then season with salt and pepper and bring to a simmer.

Reduce the heat to medium-low and cook, uncovered, until thickened, about 20 minutes.

Add the broccoli, cauliflower, and carrot to the broth mixture and simmer until tender, about

20 minutes.

Discard the bay leaves. Puree the soup in batches in a blender until smooth; you'll still have flecks of carrot and broccoli. Return to the pot. (Or puree the soup in the pot with an immersion blender.)

Add the cheese to the soup and whisk over medium heat until melted. Add up to 3/4 cup water if the soup is too thick. Garnish with cheese once in individual bowls.

Sunday, December 20, 2009

Chocolate Hazelnut Biscotti


My friend Mary asked me if I was going to put any Holiday cookies on my blog. My initial response was no, because unfortunately, I am not much of a baker. Case in point is the Oatmeal Butterscotch cookies I burnt last week! Nevertheless, Mary inspired me to give Holiday baking another try. I found this Chocolate Hazelnut Biscotti recipe on thejoyofbaking.com. If you are a baker, check this site out. I guarantee you will find a recipe you will want to try within a few clicks. I decided on this recipe because biscotti makes good individual "gifts" and I wanted to make some type of Holiday goodie for my husband to take to work and give to all the nurses that put up with him all year. :) I personally love biscotti and how it is a dessert, but can be eaten anytime of the day with coffee.

Warning: this recipe is an all day affair. There are many steps involved. The upside of this lengthy process is that I got to use my brand spanking new food processor, given to me by my wonderful for Christmas. Thanks Mom and Dad! (I did get permission to open this present early!!)

Although my biscotti did not turn out as professional looking as I hoped for, they taste delicious. Rich from the dark chocolate and ground coffee, crunchy from the toasted hazelnuts, and with the last touch of sweet white chocolate, they definitely satisfy that Holiday sweet tooth.

Chocolate Hazelnut Biscotti

Ingredients:

4 ounces of bittersweet or semisweet chocolate, coarsely chopped
1 cup of firmly packed light brown sugar
1 3/4 cup flour
1 tablespoon instant espresso (I forgot to get this, so used ground coffee instead)
1 teaspoon baking soda
1/4 teaspoon salt
3 large eggs
1 1/2 teaspoons vanilla extract
1 cup toasted hazelnuts

Directions

Preheat oven to 350 degrees. To toast hazelnuts: spread on a baking sheet and bake for 15 minutes or until lightly browned and the skins begin to flake. Remove from the oven and place nuts in a dish towel. Roll up the towel and let the nuts 'steam' for 5 minutes and then briskly rub the towel (with nuts inside) to remove the skins from the nuts. Cool and then chop coarsely. Set aside while you prepare the dough.

Reduce temperature of oven to 300 degrees. Line a large baking sheet with parchment paper.

In a food processor fitted with a metal blade, combine the coarsely chopped chocolate and brown sugar and process until the chocolate is very fine; set aside.

Sift or whisk together the flour, cocoa, espresso powder, baking soda and salt into a bowl; set aside. In the bowl of your electric mixer combine the eggs and vanilla extract and beat to blend, about 30 seconds. On low speed mix in the chocolate/sugar and flour mixtures until a stiff dough forms, adding the hazelnuts about half way through mixing.

On a floured surface divide the dough in half. Form each half into a log 12 inches long. Do this by rolling the dough back and forth into a cylinder shape with floured hands. Transfer the logs to the baking sheet, spacing them well apart (width-wise on the pan), and pat to even the shapes. Bake until almost firm to the touch, about 35 - 40 minutes (logs will spread during baking). Remove from the oven, place on wire rack, and let cool for 10 minutes.

Using a long spatula transfer the logs to a cutting board. Using a serrated knife cut the dough into slices 3/4 inch thick on the diagonal. Arrange the slices cut-side down on the baking sheet. Bake 15 minutes. Turn the slices over and bake until crisp and dry, about 15 minutes longer. Remove from oven and let cool on wire rack.


Monday, December 14, 2009

Mushroom Ragu


When I traveled to Italy in 2005, I fell head over heels for all things Italian. The language, the landscape, the history, the architecture, the vino, the people and their passion for life, but above all, the cuisine! Italian food just does me in. There is nothing more pleasurable than a big bowl of pasta - real pasta. No store bought stuff. I don't care how good you say your store bought pasta sauce is - I guarantee you, it's not good! Especially once you've had authentic Italian pasta.

I will now step down from my pasta pedestal. Believe me, once you try this ragu, you will start to see what I am talking about. This ragu hails from one of my all time favorite celebrity chefs, Giada De Laurentiis. Giada is not only beautiful, charming, and witty, but she makes Italian food accessible. I got this recipe from her cookbook, Everyday Italian. Run, don't walk, to the store and get yourself a copy if you like Italian food. Every recipe I've tried of hers is amazing!

This mushroom ragu is for you mushroom lovers out there. The earthy taste of the mushrooms shine though, but the onions and fresh parsley and basil really take this sauce to a higher level. I served it over whole wheat angel hair pasta, but Giada writes that you can also use it over meats (chicken or beef would be excellent with this) or her favorite, polenta. She also recommends using wild varieties of mushrooms like cremini, oyster, and shiitake, but all I could find was baby portobellos and it still turned out fantastic!

Giada's Mushroom Ragu

Ingredients
1/2 cup olive oil
1 large onion, chopped
1 pound mixed wild mushrooms
1/2 teaspoon salt (more to taste)
1/4 teaspoon freshly ground black pepper
1 cup Marsala
2 cups reduced sodium chicken broth
2/3 cup fresh grated Parmesan cheese
5 fresh basil leaves
1/4 cup chopped fresh flat-leaf parsley

Directions:
In a large skillet, heat the oil over medium heat. When almost smoking, add the onion and garlic and saute until the onion is tender, about 8 minutes. Add the mushrooms, salt and pepper. Increase the heat to high and saute until the mushrooms are tender and all the liquid has evaporated, about 8 minutes. Remove the pan from the head and add the Marsala. Return the pan to the heat and simmer until the Marsala evaporates, about 5 minutes. Add the chicken broth and simmer until the sauce has reduced by half, about 30 minutes. Remove the pan from the heat and stir in the cheese, basil, and parsley. Season the ragu with more salt and pepper to taste.

**This sauce can be made up to 2 days ahead. Cool, cover, then refrigerate. Re-warm before using.

Sunday, December 13, 2009

Turnip Gratin


This recipe is straight up comfort food. Layers of turnips and onion are covered in bubbly Gruyere cheese and crusty white bread. You will want to try this recipe just for the aroma it will create in your house!

I don't think I've bought white bread in my entire adult life - I'm a wheat or whole grain kind of girl. But for this recipe I made an exception and it was worth it! The white bread turns into a base on the bottom of the gratin and it's delicious.

Gratin, by definition, is when an ingredient is topped with a golden crust, and mmmmm is it good, especially when the golden crust is from creamy, nutty Gruyere cheese. I am officially a Gratin aficionado and will be on the lookout for more Gratin recipes. If you have any good ones, please send them my way!!
Turnip Gratin (found on Simply Recipes.com)

Ingredients
4 medium sized turnips, peeled and thinly slices
Olive oil
8 slices of white bread, with the crusts removed
Half an onion - thinly sliced
8 ounces of Gruyere cheese
Salt and Pepper

Directions
Preheat the oven to 325 degrees. Blanch the raw turnip slices in salted boiling water for 3 minutes. Drain and allow to cool.

Coat the inside of a 9X13 casserole dish with olive oil. Place a layer of bread on the bottom of the casserole dish. Layer on half of the turnip slices in a single layer, season with salt and pepper. Layer on all of the onions. Sprinkle with half of the cheese. Add another layer of bread, turnips, and cheese. Sprinkle again with salt and pepper.
Place casserole on top rack of oven. Cook for 25 minutes. For the last few minutes, if you want, and you are using a pan (metal or ceramic) that can safely handle broiling temperatures, broil for a couple minutes to brown the top.
Remove from oven and cool for 10 minutes before serving.

Wednesday, December 9, 2009

Chinese Napa Cabbage Salad


I've come to the conclusion that any recipe which involves sesame oil is going to be a winner. I really enjoy the flavor of sesame oil in stir fries, and our favorite short rib marinade and it adds a very lovely nutty complexity to this cabbage salad. I've read that sesame oil is the "Queen of Oils" because of it's healing powers and nutritionally, it contains Vitamin E (an anti-oxidant which helps lower cholesterol), magnesium, copper, calcium, iron and Vitamin B6.

The sesame oil is only one of the great flavors in this salad. The topping of toasted ramen noodles, almonds, and sesame seeds add a wonderful crunch and the green onion taste is mild, yet significant. The dressing is delicious, so much that I would mix it up and use again to dress any Asian salad combination.

This recipe makes a large portion, so I separated the cabbage and onions into three different containers and will add the dressing and topping to it when I eat it, so it doesn't get soggy. It would be a great side at a potluck or large meal.

Ingredients:

1 (3 ounce) package of chicken flavored ramen noodles
1/4 cup of butter
1/2 cup sesame seeds
1/2 cup slivered almonds
1 large head of Napa Cabbage, shredded
6 green onions, chopped,
1/4 cup of olive oil
1/4 cup rice wine vinegar
1 tablespoon soy sauce - I was out and used Teriyaki Sauce, which tasted fine, too!
1 tablespoon sesame oil
1/8 cup white sugar

Directions:

Crush noodles and place them in a medium sized skillet. Brown in butter over medium heat heat. Add in the almonds and sesame seeds, stirring often to prevent burning. Add seasoning mix from ramen noodles and cool (I only used 1/3 of the packet and found that to have more than enough of the chicken flavoring).

Prepare the dressing by whisking together the oils, vinegar, soy sauce, and sugar. Add in salt and pepper to taste. Pour dressing over salad and toss with topping.

Kohlrabi and Apple Slaw with Creamy Coleslaw Dressing


You may be saying to yourself, "Self, what in the world is kohlrabi?" Allow me to explain, because I wondered the same thing. Kohlrabi is a German Turnip that can be eaten raw and tastes similar to the stems of broccoli. I am sure some of you will never try this recipe purely because of that. However, I want to encourage you to give it a try...it's loaded with Vitamin C and has a good amount of Potassium. It tastes slightly like a radish and is a very interesting vegetable to peel and cut.
This recipe was given to me at my local Farmer's Market. It sounds strange, combining cream with mustard and sugar with Kohlrabi, but somehow it works. The mint really makes this all come together.

Ingredients:

1/4 cup cream
1 tablespoon of fresh lemon juice
1/2 tablespoon of "good" mustard - I used Grey Poupon
1/2 teaspoon sugar
Salt and Pepper to taste
Fresh mint, chopped
1 fresh Kohlrabi, trimmed, peeled, and cut into batons
2 apples, peeled and cut in batons
**The key is to keep the ratio of apples:Kohlrabi equal

Directions:

Whisk the cream into light pillows --- I never saw "pillows" but I did see bubbles. :) This takes a minute or so, you do not need a mixer. Stir in remaining dressing ingredients and pour over the kohlrabi and apples.


Wednesday, December 2, 2009

Eggs on the Eights


Breakfast is by far my favorite meal of the day. I can and sometimes do, eat breakfast any time of the day. Eggs are my best-loved breakfast food and before I became a married woman, I often ate eggs for dinner. My love affair with eggs drives my husband crazy. He is not such a breakfast fanatic, so alas, I must restrict my egg eating to morning hours. (At least while my husband is around...there are times where he works late or is on the night shift and I can indulge in my egg eating past 10 AM!)

This recipe comes from Rick Bayless, who I absolutely adore. When I first saw Rick Bayless on Top Chef Masters, he quickly became my favorite chef. He has such a warm, kind personality and best of all, makes one of my favorite cuisines, Mexican. I was so happy when Rick took the title of Top Chef . I hope to someday visit one of his restaurants in Chicago. For now, I browse his website and admire from afar. While perusing Rick's website, I found a TV episode he did for Mother's Day brunch ideas. He calls this Fritatta "Eggs on the Eight" because the number 8 is used a couple of times in the recipe. You can watch the video yourself here: http://www.rickbayless.com/rbnews/media_gallery.html

I prepared it for my Mom, Dad, and husband while my parents were visiting for Thanksgiving. It was an instant hit and really filled us all up.

If you are a breakfast enthusiast, like myself, or want a really easy breakfast idea for when you have guests, be sure to give this recipe a try. You can add in whatever veggies, meats, or cheeses you like.


Eggs on the Eight

Ingredients:

Six Eggs
Olive oil
Chopped Potatoes (I used potatoes I had on hand for Thanksgiving Mashed Potatoes, but Rick recommended red potatoes)
Turkey Sausage (Rick used bacon)
Green Onions
Cheese of your preference
Cream (I use Fat Free Half & Half)
Salt
Pepper
Garlic Powder
Other seasonings you prefer in your eggs (I use Dry Mustard and Seasoning Salt every time!)


Directions:

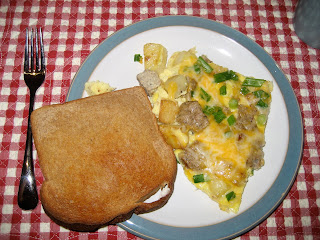
Heat the oven to 350. In a large skillet heat the potatoes and let them brown. Meanwhile chop the sausage in bite size pieces, and whip together the eggs, cream, and seasonings in a bowl. Once potatoes are golden brown, add in the meat to heat through - just a few minutes. Pour the egg mixture into the skillet and using a fork, make 8 figure 8s to combine the eggs with the potatoes and meat.

Place the skillet in the oven for 8 minutes. Once you take the skillet out, sprinkle your fritatta with chopped green onions and cheese.

LinkWithin

Related Posts with Thumbnails